5 EASY STEPS TO INSPECT & CHANGE YOUR AIR COMPRESSOR BELT
Air compressors work best when well maintained. One important component of the compressor is the belt. Often hidden behind protective belt guards, it’s maintenance or replacement is easy to forget. However, with maintenance of your compressor belt you can improve the performance of your air compressor & even extend the life of your air compressor.
Follow this step-by-step process to replace or re-tension the air compressor belt. Consult your Campbell Hausfeld product manual for additional details specific to your compressor.
We recommend that you inspect & adjust tension on the compressor belt every 3 months.
Step 1: Remove belt guard.
A beltguard is designed for your safety, never run a compressor without the beltguard on the compressor & securely fastened.
- A beltguard is held together by pressure snaps or screws.
- Carefully remove the beltguard by twisting & separating pressure snaps or removing beltguard screws
- Store screws in a safe place to be reattached later.
Step 2: Inspect Belt.
- Visually check entire belt for breaks or fraying.
- If the belt shows signs of damage and needs to be replaced, move on to Step 3.
- If the belt appears to be in working order and has no signs of damage move on to Step 4.
Step 3: Remove & Replace Belt.
- Loosen (but do not remove) the four bolts (1) holding the motor in place.
- Shift the motor towards the pump. The belt should be loose and easily removable.
- Move the motor back to the original position to create proper belt tension.
- Tighten the motor bolts.
- Replace the belt. (To determine the replacement belt size your compressor needs consult your owner's manual to determine the proper size belt for your compressor
Step 4: Aligning & Tensioning Belt.
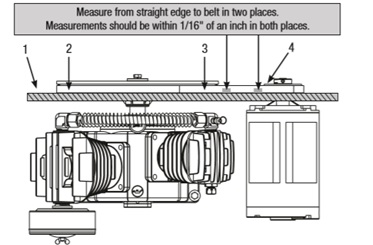
- Lay a straightedge (1) against the face of the flywheel touching the rim at two places (2,3). Image below is a helpful guide of general location and of components.
- Adjust the motor pulley so that the belt (4) runs parallel to the straightedge. Use a gear puller to move the pulley on the motor shaft. Tighten the setscrew after the pulley is positioned.
- Belt tension is determined by how much the belt moves when weight is applied. The belt should move no more than 1/4 in. to 3/8 in. downward if normal thumb pressure is placed on it. Ideal tension can very slightly, consult owner’s manual for recommended tension by unit.
- Adjust the motor’s distance from the pump by slightly adjusting motor position to pump. Tighten motor bolts & roll belt back in place. You may need to repeat the process of adjusting and testing tension.

Step 5: Reattach the belt guard.
- Place beltguard back on unit and either snap pressure snaps back in place or replace screws and tighten.
- Remember, Air compressors produce a lot of vibration that can loosen screws if not fastened properly.
Following these 5 Easy Steps will help extend the life of your Air Compressor and to get your job done!
For more information check out your product manual or contact our customer service team at 800-543-6400 (Mon-Fri, 7:30 a.m. – 4:30 p.m. EST) or email at chpowercustomerservc@campbellhausfeld.com for any questions to have referrals with your local service center.
Campbell Hausfeld – The Air Power Expert.
Committed to Helping You Get the Job Done!

